Inkscape, the free SVG editor.
Creating dance step diagrams is fun and easy. By taking a few minutes to make one, you will help other dancers understand the mechanics of the dance -- and you'll make sure that everyone in the world comes to know how they swing in your neck of the woods.
This page will guide you through the process of making a dance diagram.
Getting the software[]
If you already have software you wish to use to create diagrams, you may do so. However, Lindypedia strongly recommends you use Inkscape, the free Scalable Vector Graphic editor. We recommend this program for several reasons:
- It's free and open source (no adware or spyware).
- It's easy.
- It's available for all popular operating systems.
- By using SVG files, you will be able to create diagrams without doing any pixel editing. In other words, you will simply move around the elements in the diagram. There is no need to erase or air brush in vector graphics.
- SVG files can be scaled to any size for printing -- they can be small enough for use on screen or large enough for a billboard. They lose no quality in magnification or reduction.
Hence, the rest of this tutorial will focus on use of Inkscape.
Downloading a sample[]

charleston-8-basic.svg
After you've installed Inkscape but before you've started it, you should download a sample SVG that you can use as a template.
(After following the link, click on the diagram to bring it to full size. Then right click and click "Save Page As..." If the extension is PNG, you haven't loaded the image at full size.)
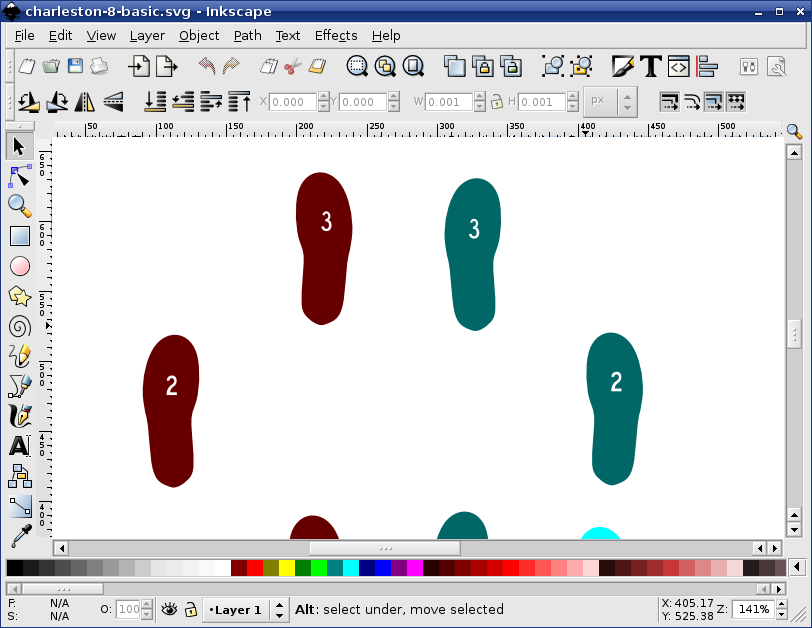
Once you've downloaded the SVG to your computer, start Inkscape and open the file. You'll notice that it appears as a full letter-size page. For our purposes, that will not matter -- you'll be able to create content on or off the page. You can take up the full page or just a small corner of it.
Move those feet![]
Once you have the SVG loaded, go ahead and play around with it. If you screw up the file, you can always download a fresh copy of it here.
Start by clicking on the feet and dragging them around. When one is selected, copy it and then paste new ones.
Note that when a foot is selected, you can easily resize it, as well, with arrows provided at the corners. If you click the foot a second time, the arrows change direction -- you're now able to rotate and skew the foot. Click again on the foot, and the arrows change back to resize mode.
See how easy that was?
Learning the interface[]
There are a few basic buttons found on the Inkscape toolbars that will help you create an awesome diagram.
Pointer Buttons[]
Side toolbar, top - These buttons are used to move objects within Inkscape. The top one, always selected by default, is for translating and rotating objects. You can also use this to drag and select several objects at once.
The bottom icon is used for moving points within objects. This puts the "vector" in Scalable Vector Graphic. This is a little more advanced, but play with it; you'll figure out how it works.
Translation Buttons[]
Top toolbar, left - The left four buttons are used for flipping or rotating an object without using the mouse.
The four buttons on the right control layering of an object. They send an object to the back, behind by one layer, ahead by one layer, and to the top, respectively. This is useful when you have several feet in the same area. (Wouldn't want to step on toes.)
Line Drawing Buttons[]
Side toolbar, middle - These three buttons are used for drawing lines within Inkscape, undoubtedly useful for dance diagram creation. The top is for freehand drawing, the middle is for point-to-point drawing (good for vector alterations, afterward), and the bottom is for calligraphic pen.
You will be able to move around any drawn lines with the pointer tools. With the tool used for editing points within objects, you will actually be alter to alter the shape of the lines after drawing them.
Text Tool[]
Side toolbar, bottom - Use the text button to add any text needed for your diagram, including numbers for feet. Controls for font and size will appear once you click it; these, along with the color bar, can used before or after creating the text box.
Like lines, the text can be moved after typing to wherever you wish it.
Properties Tools[]
Top toolbar, right - When an object is selected and you click the button on the right, you will be given the ability to change properties on a detailed level. These properties include color, opacity, outline, line shape and thickness, et cetera.
The same goes for the text properties button on the right. After selecting a textbox and clicking this button, you will be given advanced option for font, alignment, et cetera.
Exporting the final product[]
Once you've created a diagram to your liking and saved it as an SVG (remember to always save your work as you go), you can export it to a PNG format with Inkscape. PNG files is a high-quality compressed image, much like a JPG, and they are often used for illustrations and diagrams on wikis.
To begin, click on the "Export this document or a selection of this document..." button, as highlighted in the image below.
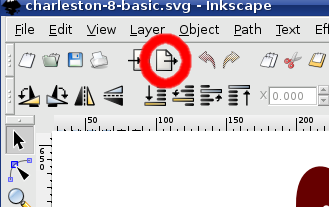
A window similar to the one below will appear.
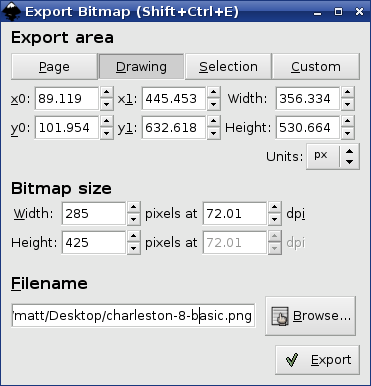
Make sure that you tell Inkscape to export the drawing, not the page. Choose the "Drawing" button in the "Export Area" area. Inkscape will automatically select only the drawing, cropping it perfectly.
In the "Bitmap Size" area, make sure you export the image to 72 DPI. This is the standard resolution for a computer screen, which means that when exported, your diagram will appear exactly as it did in Inkscape at 100% magnification.
Finally, choose a location for saving your PNG and click "Export." After the progress bar is done, close the "Export Bitmap" window.
Find where you saved the PNG copy, and bask in its glory. It should be perfectly sized and cropped.
Which files to upload?[]
Once you have your PNG, you are ready to upload it and place it in an article about the dance step. You can follow the instructions in How You Can Help for uploading the image.
Keep in mind that because you want the image to be a part of the article rather than a supplement to it, you should not use a thumb tag and caption in the code.
You should also consider uploading the SVG file if you've made significant alterations or improvements. This way, anyone who wishes to use your diagram as a base -- or someone who may wish to make an alteration -- can make the changes in Inkscape in seconds. This is much harder to do with a PNG file. You can place a link to the SVG underneath the diagram, such that the whole package might look like this:

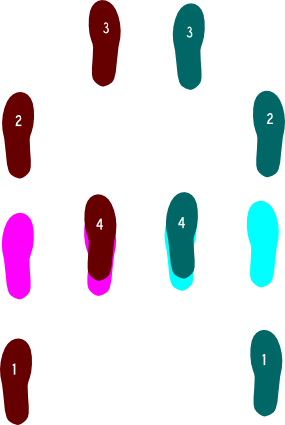
The code would look like:
== Charleston Steps ==
=== Basic 8-Count ===
[[Image:charleston-8-basic.png]]
[http://swing.wikia.com/wiki/Image:Charleston-8-basic.svg Original SVG]